
If you're looking for fun seasonal wall art projects for kids, I've got some great ideas! Imagine creating a colorful autumn leaf wreath or a playful fall-themed leaf mobile. You could also design pop art pumpkins or craft a beautiful nature art scroll with collected leaves. Each project offers a chance to spark creativity and connect with nature, making memories along the way. Ready to explore even more delightful projects? Let's get started on this creative journey together!
Design Highlights
- Create a colorful autumn leaf wreath using vibrant leaves, a foam wreath form, and natural elements for added texture.
- Make a fun fall-themed leaf mobile by tracing and cutting out leaf shapes from colorful paper or real leaves, then threading them with fishing line.
- Engage kids in a pop art pumpkin creation project using bright acrylic paints to create bold pumpkin designs on canvas.
- Foster teamwork with a 3D cardboard turkey collage, allowing kids to personalize their turkeys with feathers and glitter while developing fine motor skills.
- Explore the barn quilts project, encouraging collaborative artistic expression through unique designs that blend art and science with color patterns.
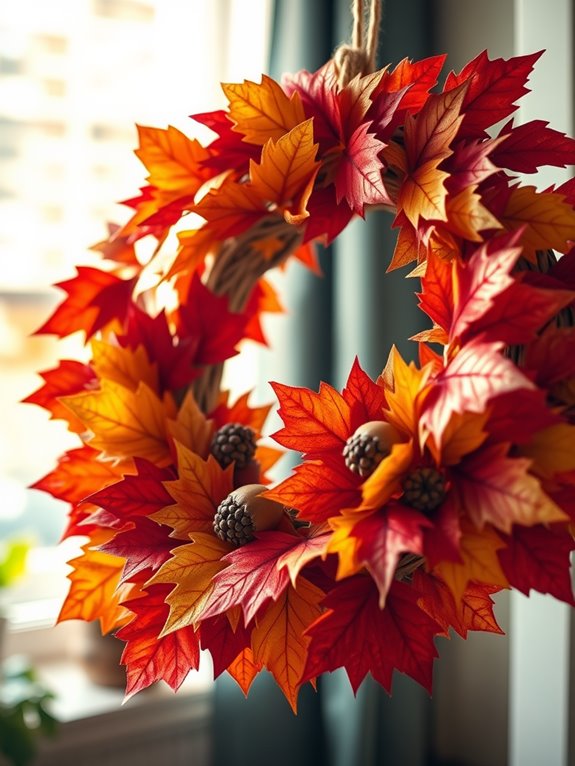
Create a Colorful Autumn Leaf Wreath
As the leaves begin to change and the air turns crisp, there's something magical about autumn that inspires creativity.
One of my favorite autumn art projects is creating a colorful autumn leaf wreath. First, I gather a variety of vibrant leaves, each unique in shape and size. Then, I use a circular base, like a foam wreath form, to attach the leaves with hot glue. To make it even more special, I incorporate paint or markers to enhance the colors or add fun patterns. Adding natural elements like twigs, acorns, or berries brings texture and life to the design. Additionally, consider using weather-resistant materials(lightweight, waterproof materials) to ensure your wreath can withstand the elements if displayed outdoors. You can also draw inspiration from autumn tree wall decals to create a cohesive seasonal theme in your child's room. Creating this wreath can also be a great way to introduce kids to seasonal themes and the beauty of nature in fall. Moreover, using decorative elements like pumpkins can enhance the overall autumn aesthetic of your projects. Using seasonal motifs such as leaves and pumpkins can further enrich the design and celebrate the spirit of Thanksgiving.
Once it's finished, I hang my wreath proudly, celebrating the beauty of the season and spreading seasonal cheer. Why not try this craft idea yourself?
Make a Fun Fall-Themed Leaf Mobile
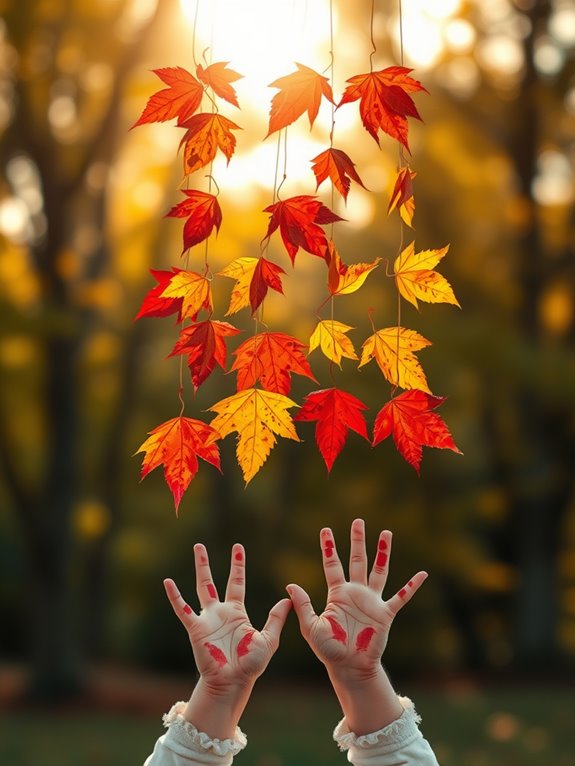
Let's get creative and make a fun fall-themed leaf mobile that captures the essence of autumn!
I'll walk you through the materials we'll need, a simple step-by-step assembly guide, and some imaginative decoration ideas to make your mobile truly unique. To enhance our project, we can also consider incorporating vibrant canvas prints that showcase autumn landscapes as part of our decorations. Adding some rustic welcome signs can also bring a warm touch to our fall-themed decor. Additionally, using warm-colored wall art can further enhance the cozy atmosphere we're aiming to create.
To add more character to our mobile, we can use rustic wood signs that celebrate the season, creating a welcoming atmosphere around our project.
With a little effort, we can bring a touch of nature indoors and celebrate the beauty of the season together!
Incorporating unique wall decor ideas can elevate your home's ambiance during the fall.
Materials Needed for Mobile
Creating a fun fall-themed leaf mobile is a delightful way to embrace the season's vibrant colors and textures. To get started, gather some colorful paper—think reds, oranges, and yellows—or collect real leaves for a more natural touch. You'll also need fishing line, scissors, a stick or dowel for hanging, and a needle for threading. Using a leaf template, trace and cut out uniform shapes from your chosen paper. Once you have your leaves, poke holes at the top with a needle to prepare them for threading. Vibrant colors are key to making your mobile visually appealing, so choose shades that reflect the essence of fall. Incorporating stunning wall decor can enhance your overall seasonal theme, such as using handcrafted pieces like the HOMirable Spring Wall Decor Bicycle Hanging Sign to complement the mobile. Additionally, consider displaying Thanksgiving wooden wall signs to create a warm atmosphere that aligns with the season. Arrange them on the fishing line to decide how you want your mobile to look. This project's not just fun; it's a creative way to celebrate fall! Additionally, consider incorporating seasonal updates to keep your decor fresh throughout the changing seasons.
Step-by-Step Assembly Guide
Get ready to bring some autumn magic into your home with a delightful leaf mobile! Start by tracing and cutting out leaves from your children's artwork using leaf templates. It's a fun art activity that sparks creativity! Additionally, incorporating rustic elements in your decor, like natural twigs or branches, can enhance the overall fall theme. Using weather-resistant materials for your mobile ensures it can be displayed outdoors without worry. To give your mobile a cheerful touch, consider adding nature-inspired elements similar to those found in decor like the Fall Sunshine Sunflower Canvas.
Moreover, you can use durable materials for constructing the mobile frame to ensure it stands the test of time and seasonal changes. Next, poke holes at the top and bottom of each leaf with a needle or safety pin. Then, thread fishing line through those holes for easy hanging. Arrange the leaves on a stick to visualize your design, ensuring any added details are dry.
Mix different art styles, like watercolor and crayon, to make each leaf pop! Including warm autumn hues like oranges, browns, and yellows can add a cozy touch to your mobile. Finally, hang your completed mobile indoors or outdoors. It's a perfect way to celebrate the fall season and showcase your family's unique fall art projects!
Creative Decoration Ideas
Have you ever thought about how a simple mobile could transform your space into a cozy autumn retreat? Making a fun fall-themed leaf mobile is a delightful arts and crafts project that captures the spirit of the season.
Start by gathering a variety of fresh or dried leaves. Using templates from the Fall Leaf Bundle, trace and cut out colorful leaves, maybe even from your child's artwork! Poke holes at the top and bottom, then thread fishing line through. Incorporating rustic watercolor designs can add a charming touch to your mobile. Adding accents like rustic wooden signs can also enhance the autumn vibe in your space. You might even consider incorporating a Thanksgiving wall sign to create a festive atmosphere. To ensure your mobile lasts through the season, consider using moisture-resistant materials that withstand varying humidity levels.
A stick from the garden serves as the perfect base. Lay out the leaves in seasonal colors—reds, oranges, and yellows—before hanging them for a balanced look. This process art not only brightens your space but also creates cherished memories together, while incorporating classic autumn elements enhances the overall seasonal theme!
Design Your Own Pop Art Pumpkin
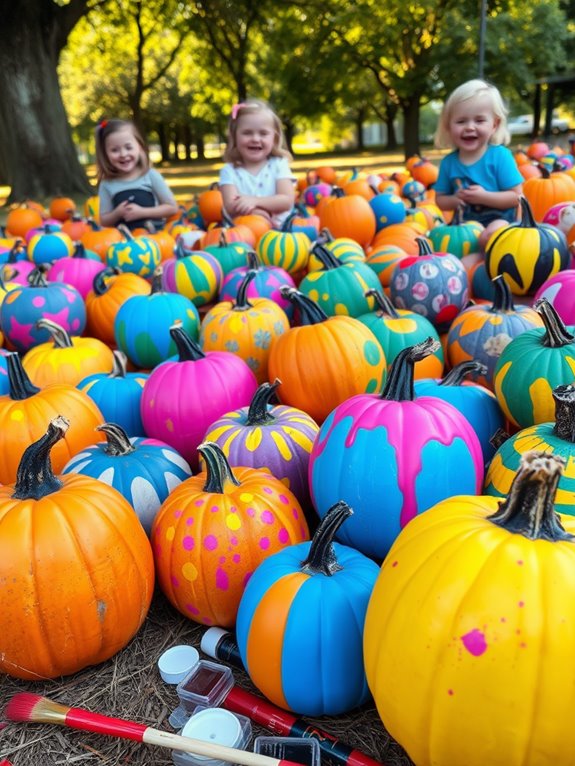
Let's get creative and design our own pop art pumpkin!
With just a few materials, like vibrant paints and fun stickers, you can transform a plain pumpkin into a colorful masterpiece.
I'll guide you through the step-by-step process, and soon enough, you'll have a fabulous piece of art ready to display for all to see!
Materials Needed for Project
As you immerse yourself in the colorful world of pop art pumpkins, gathering the right materials is essential to release your creativity.
You'll need a blank canvas or sturdy construction paper as your base. Vibrant acrylic paints will bring your pumpkin to life, so grab a variety of colors.
Don't forget brushes, sponges, and dotting tools for different effects! Stencils or templates can help shape your pumpkin, while markers add those fine details and outlines that make your artwork pop.
Keep contrasting colors in mind to capture that iconic pop art style.
And let's be practical—have paper towels or wipes on hand for quick clean-ups.
Want to add flair? Glitter and sequins are great optional materials for extra texture!
Step-by-Step Creation Process
Now that you've gathered all your materials, it's time to bring that pop art pumpkin to life! Follow these fun steps to create a vibrant masterpiece:
- Sketch a bold pumpkin outline on your canvas, exaggerating its features for that pop art flair.
- Grab your acrylic paints or markers and fill in the pumpkin with bright, contrasting colors. Use techniques like stippling for extra texture.
- Add graphic elements like polka dots and stripes around your pumpkin, and don't forget comic-style text bubbles for that added punch!
- Outline everything in black to make your artwork pop, just like in classic pop art.
Let your creativity shine through this art project! Once it's dry, you'll have a fantastic piece to share and celebrate.
Displaying Your Artwork
Transforming your pop art pumpkin into a stunning display is an exciting part of the creative journey!
Once you've painted your masterpiece, it's time to show it off. Find a well-lit spot, either indoors or outdoors, where it can truly shine. The vibrant colors and unique patterns will catch everyone's eye!
Remember, art is a fun way to express yourself, so consider adding comic-style speech bubbles or playful phrases to make your pumpkin even more engaging.
If you want to make great impact, try grouping your pop art pumpkin with other seasonal decorations. This way, you create a festive atmosphere that celebrates your creativity.
Craft a Beautiful Nature Art Scroll

Creating a Nature Art Scroll isn't just a craft; it's an adventure waiting to unfold! Imagine foraging for leaves, twigs, and other treasures, then transforming them into stunning nature art.
This project is perfect for kids of all ages, fostering creativity and connection with the great outdoors.
Here's how to get started:
- Gather natural materials on a nature walk.
- Paint your scroll with colors that inspire you.
- Glue your collected items onto the scroll.
- Display your unique artwork at home!
This engaging activity not only helps kids express themselves, but it also encourages them to explore their surroundings.
Stitch Together a Folk Art Plate
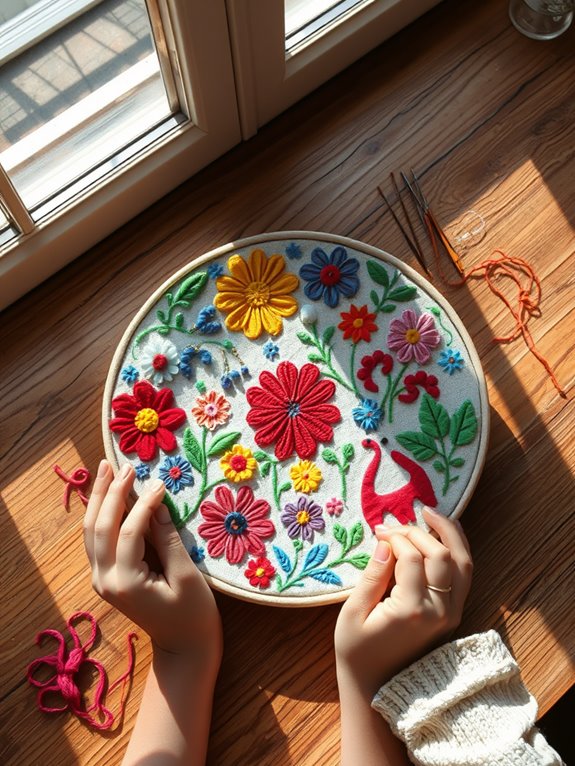
Let's get ready to stitch together some beautiful Folk Art Plates!
With just a few simple materials like fabric, embroidery thread, and a needle, we can create unique pieces that reflect our own styles.
Are you excited to learn the step-by-step process and make something special for yourself or as a gift?
Materials Needed for Stitching
When you're ready to stitch together your own Folk Art Plate, gathering the right materials is key to making your project a success.
I love how simple it can be! Here's a list of essential materials you'll need for this fun art project:
- Felt in a variety of colors
- Embroidery floss
- A needle (a blunt one is best for kids!)
- Scissors
Don't forget to have a sturdy backing, like cardboard or lightweight wood, to give your plate durability.
You might also want to add some optional embellishments like beads or buttons to personalize your creation.
With these materials in hand, you're all set to plunge into a joyful crafting experience that sparks creativity!
Step-by-Step Craft Process
As you immerse yourself in the delightful world of crafting a Folk Art Plate, you'll find that the process is just as rewarding as the finished product.
Start by gathering simple materials like felt, embroidery thread, a needle, and scissors. Use a plate template to cut out a circular shape from the felt.
Now, here comes the fun part—decorate your plate! Stitch flowers or geometric shapes using colorful embroidery thread. Want to make it even more unique? Add buttons or beads as embellishments!
Once you've finished, display your stitched folk art plate proudly as a vibrant piece of wall decor. It's a fantastic way to celebrate creativity and showcase your crafting skills.
Build a 3D Cardboard Turkey Collage
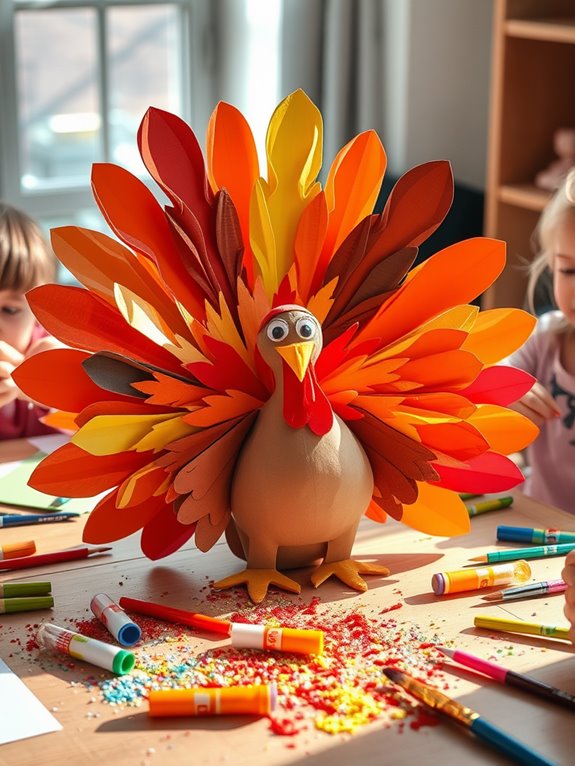
Creating a 3D Cardboard Turkey Collage isn't just a fun project; it's an exciting way to bring your imagination to life!
With this mixed media craft, kids can express their creativity and explore a variety of materials. Here's what you'll need:
- Colorful paper
- Scissors
- Glue
- A free turkey template for tracing
Using the template simplifies the crafting process, allowing kids to cut and assemble their vibrant turkeys.
They can add personal touches with feathers, markers, and glitter, enhancing their artistic expression. Plus, this project fosters teamwork, as kids can collaborate and share ideas.
Engaging in this seasonal craft also helps develop fine motor skills, making it both fun and educational.
Get creative and enjoy!
Paint a Harvest-Themed Wall Hanging
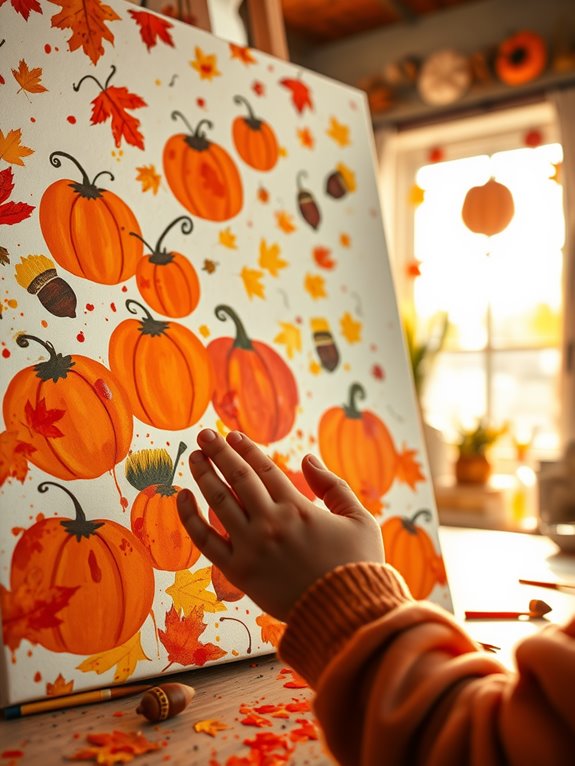
After enjoying the lively creation of a 3D Cardboard Turkey Collage, how about we channel that same energy into a new art project?
Let's paint a harvest-themed wall hanging! Gather some canvas or sturdy paper, along with acrylic paints in beautiful fall colors.
I love the idea of using handprints or fingerprints to represent pumpkins, apples, and corn—it adds a personal touch that's so special! You can also incorporate real leaves or twigs to bring nature into your artwork.
For a fun twist, use sponges or bubble wrap to create textures that mimic harvest fields.
Once your masterpiece is complete, hang it up proudly to celebrate autumn and showcase your arty crafty creativity!
Let's get those brushes ready!
Create a Collection of Cardboard Barn Quilts
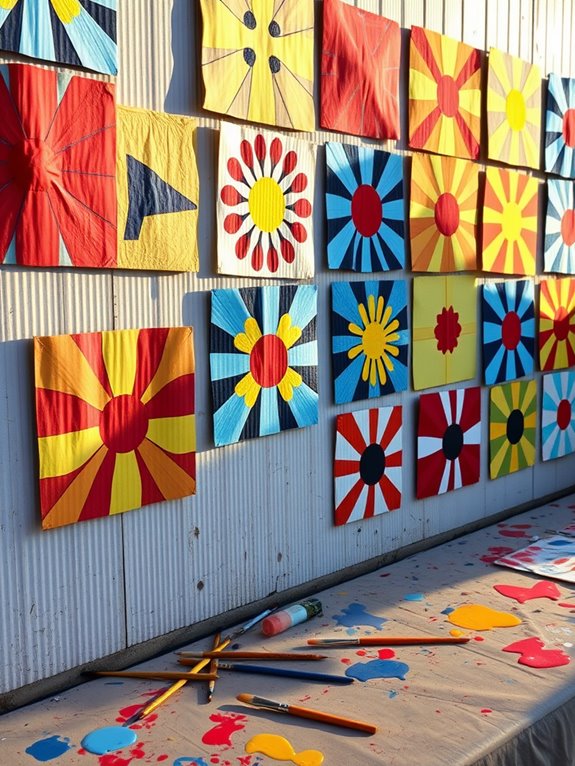
Imagine transforming colorful cardboard into a stunning collection of barn quilts that not only brighten your walls but also ignite your creativity!
This project is perfect for all ages and encourages collaboration, allowing each child to express their unique design. Plus, it's a fantastic way to blend art and science, as kids explore patterns and colors while developing fine motor skills through cutting and gluing.
Here's how to get started:
- Gather colorful cardboard or paper.
- Cut the material into quilt-like squares.
- Arrange the squares in different patterns.
- Glue them onto a backdrop to create your masterpiece.
As you work, you'll discover the historical significance of barn quilts and enjoy a fulfilling artistic experience.
Let's get crafting!
Make a Magical Mark Making Forest
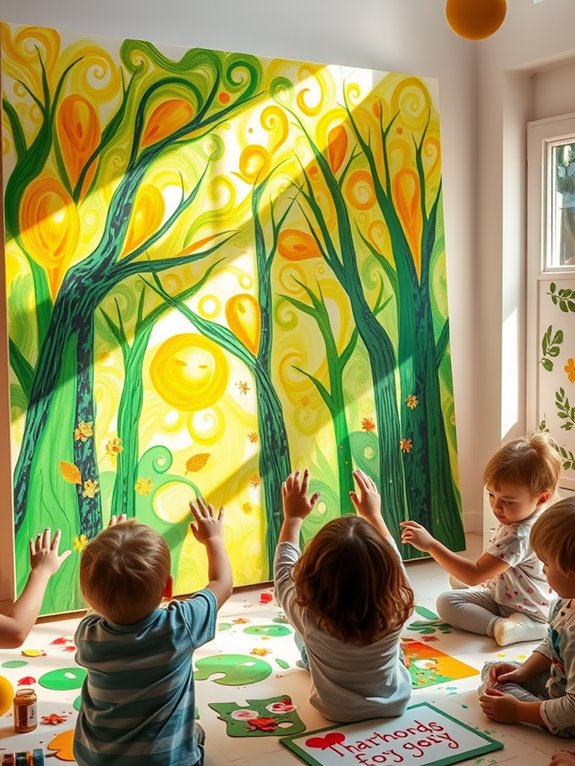
Step into a world where creativity thrives and nature inspires! In the "Make a Magical Mark Making Forest" project, kids can release their artistic flair by using items from the great outdoors, like leaves and twigs.
This year-round activity is especially fun in the fall, as we explore textures and patterns that remind us of a vibrant forest.
Whether you're a beginner or an experienced artist, this project hones fine motor skills while allowing for personal expression.
Detailed instructions make it easy for kids to engage with minimal supervision. Plus, it's perfect for group settings, whether in classrooms or community art programs.
Wrap or Paint Dried Branches for Display
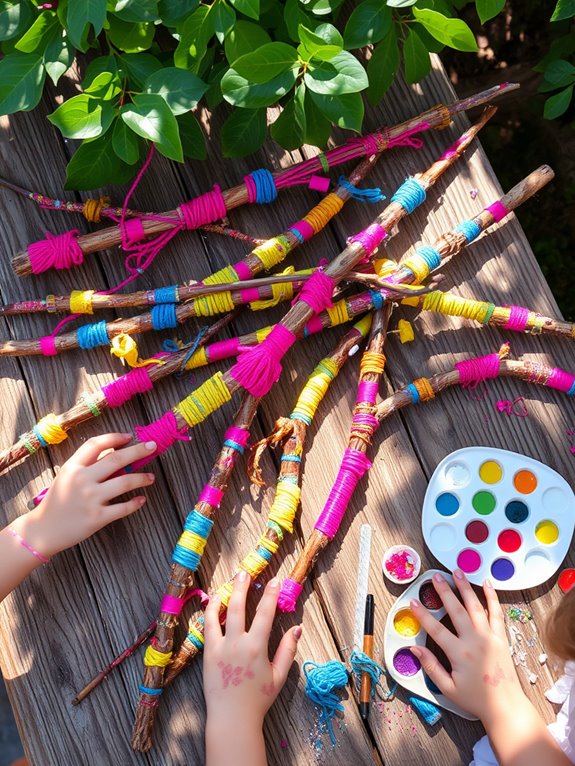
As you gather dried branches from your backyard or a nearby park, you'll discover a world of artistic possibilities waiting to unfold. This project is much fun and perfect for kids to express their creativity!
Here's how you can get started:
- Wrap branches with colorful yarn or string.
- Paint them with vibrant colors or patterns.
- Add beads for an extra flair.
- Create paper flowers to attach, turning your branches into stunning displays.
Not only does this activity spark imagination, but it also helps develop fine motor skills.
Kids can explore nature and turn simple branches into unique seasonal decorations for home or classroom.
Frequently Asked Questions
What Materials Do I Need for These Wall Art Projects?
When I think about materials for wall art projects, I get really excited!
You'll need basic supplies like paper, scissors, and glue. Don't forget markers, paints, and maybe some glitter for that extra sparkle!
Natural items like leaves or twigs can add a unique touch.
What's great is that you can use recycled materials too. Just imagine the creative possibilities!
How Long Do These Projects Typically Take to Complete?
You'd think creating wall art would take forever, right? Surprisingly, most projects only take about an hour or two!
I love how we can plunge into creativity without losing an entire day. Depending on the complexity, some might even wrap up quicker.
Just think about how rewarding it feels to see your artwork come to life.
Can These Projects Be Modified for Younger Children?
Absolutely, you can modify these projects for younger kids! I love simplifying techniques and using kid-friendly materials.
For instance, swapping scissors for tearable paper makes it safer and easier. You could also focus on larger shapes or fewer steps to keep them engaged.
Isn't it wonderful how creativity knows no age? Encouraging their artistic flair not only builds confidence but also creates priceless memories.
Let's plunge into crafting joy together!
Where Can I Display the Finished Wall Art?
I love showing off my finished wall art! You can display it in various places—on your living room wall, in a hallway, or even in your child's bedroom.
How about creating a dedicated art wall? You could use clips or frames to easily switch out pieces. Imagine the joy of seeing your child's creations brighten up your space.
Where will you showcase your masterpiece? Let your creativity shine and inspire others!
Are There Safety Concerns With Any Specific Materials Used?
Absolutely, there can be safety concerns with certain materials!
I've found that some glues and paints may contain harmful chemicals. It's always a good idea to check labels and choose non-toxic options—your safety comes first!
Plus, using child-friendly supplies makes the experience more enjoyable. Have you ever wondered how much more fun it's when we're all safe?
Let's create beautiful art without the worry. Happy crafting!
Conclusion
As we plunge into these fun seasonal wall art projects, let's celebrate creativity, embrace nature, and enjoy quality time together. Whether you're crafting a colorful wreath or designing a pop art pumpkin, each project is a chance to express yourself and make lasting memories. So grab those supplies, gather your little artists, and let your imaginations run wild. After all, what better way to welcome the season than by adorning our walls with the beauty of autumn?